Tutorial - My First Clip
This tutorial doesn’t assume any existing MotorCortex knowledge.
Getting started
First thing to do when you want to create a new clip is to use our cli. In order to run it you need to have node and npm installed on your computer. On your terminal go to the folder you want to place your clip and run the command:
npm create donkeyclip@latest <name of your clip>
The command will download the starter repo, create a new folder with the same name as your clip and install the dependencies. This might take some moments. Enter the folder and run the command:
cd <name of your clip>
npm start
Your browser will come up and you’ll see Dcode. Dcode is a web-based tool to help you develop, test and publish your clips on donkeyclip. We’ll come back to it later on this tutorial.
Repo contents
Before diving into the details of Dcode let’s have a quick look at the contents of the created folder. Along with common files used in all js / ts repositories you’ll find two folders:
- the
clipfolder and - the
serverfolder.
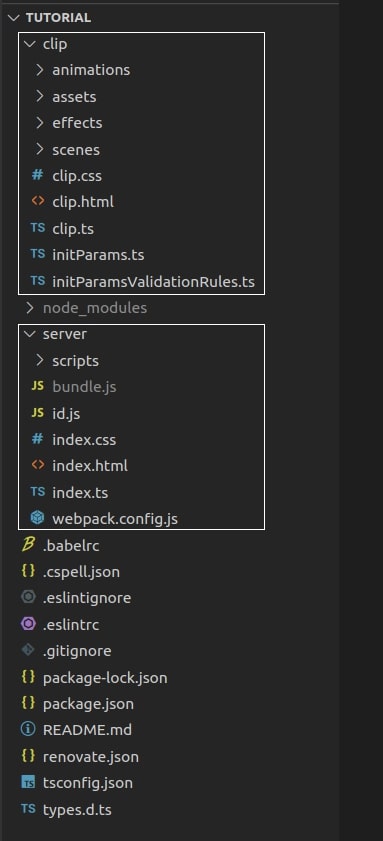
Server folder contains code that serves the needs of Dcode and renders the clip on the browser while you’re working on it. The code is open so you can have a look but in general there’s nothing to touch or care about in this folder. Treat it as a “system folder” and just forget about it.
The folder that we are going to work in is the clip folder. That’s the folder that hosts our clip’s code. Treat it as “our workspace”.
Open this folder and you’ll find the files:
- clip.html
- clip.css
- clip.ts
which are the clip’s html, css and logic. Also, you’ll see:
- initParams.ts and
- initParamsvalidationRules.ts
files which will help us make our clip dynamic so it can accept parameters. We’ll come back to these files later in this tutorial. Finally you’ll find the
effects,scenesandanimations
folders which host all of your Incidents, either effects, scenes or animations respectively. We’ll learn how to distinguish them on the go.
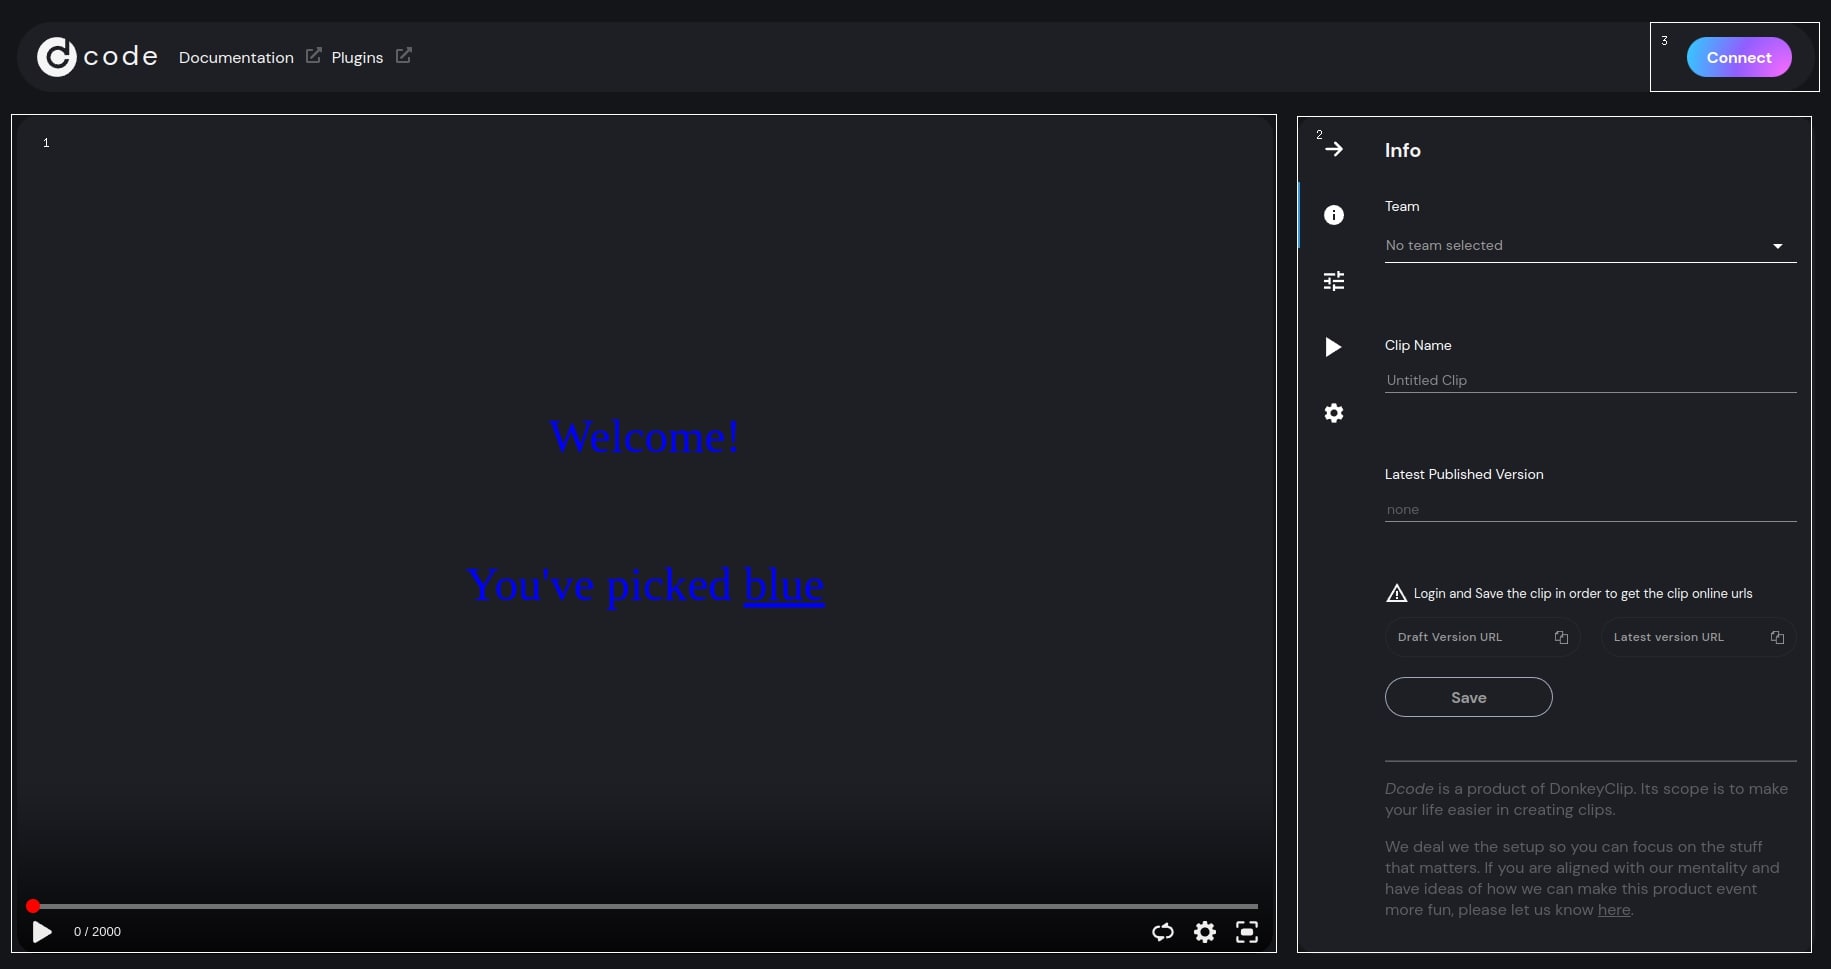
DCode UI
Let’s have a look at DCode’s layout. On the left (1) there is the clip that runs locally on your machine along with the player which you can use to play, pause, seek on it. On the right (2) there is a list of tools that allow you to name your clip, test it with various parameters (for dynamic clips), and change the player's style. On the top right (3) you can connect in order to publish your clip on donkeyclip.
Design
Exactly as in any other front end development work, the first thing to do before start implementing our clip is to come up with a design for it. And by design we mean both the look of it and the animations. Once you have your clip on paper or in mind you’re good to go.
What are we creating?
In this tutorial we are going to create a clip to be used as a banner for an online sportsware store which wants to promote their new shoes collections.
Our clip is going to be very simple. Three columns, one for each collection will slide in from the left, will stay still for a couple of seconds and they'll smoothly slide out on the right. The clip will be loopable.
Start with the clip
Let’s start by creating our clip’s html and css. Remember the clip we are developing is 100% isolated so no matter where we are going to use it the only css and ts that will run on it is the one we are going to implement here.
HTML and CSS
In order to define your clip’s html just open the file clip.html. There you’ll find the sample code from the starter repo. You can just delete it and write your html. Same stands for the clip.css file. While you are working on your clip you will realise that on save you get your changes immediately reflected on Dcode.
Let’s edit our files to start implementing our clip. You can see the code we are using on the branch clipCreation of our tutorial repo. It’s plain html and css which you can literally understand just by looking at it.
<div id="root">
  <div class="item" id="item1">
    <div>
      <div class="title">Running</div>
      <div class="img">
        <img
          src="https://donkeyclip.github.io/tutorial/clip/assets/shoe1.png"
        />
      </div>
    </div>
  </div>
  <div class="item" id="item2">
    <div>
      <div class="title">Street</div>
      <div class="img">
        <img
          src="https://donkeyclip.github.io/tutorial/clip/assets/shoe2.png"
        />
      </div>
    </div>
  </div>
  <div class="item" id="item3">
    <div>
      <div class="title">Casual</div>
      <div class="img">
        <img
          src="https://donkeyclip.github.io/tutorial/clip/assets/shoe3.png"
        />
      </div>
    </div>
  </div>
</div>
Do not use local URLs in your clip because when you publish it the assets don't upload.
In order to use your own assets in your clip, upload them everywhere (drive, GitHub, or somewhere else) and copy the URLs. If you try to upload them to GitHub, don't forget to enable the GitHub pages for the repository and take the URL from there.
#root {
  position: relative;
  width: 100%;
  height: 100%;
  background: white;
  --column-width: 260px;
}

.title {
  text-align: center;
  font-size: 34px;
  padding: 20px 0;
}

.item {
  width: 100%;
  height: 100%;
  left: 0;
  position: absolute;
  font-family: "Oswald", sans-serif;
  display: flex;
  justify-content: flex-end;
  text-align: center;
}

.item > div {
  width: var(--column-width);
}

#item1 {
  z-index: 3;
  left: calc(var(--column-width) * -2);
  background: white;
  color: black;
}

#item2 {
  left: calc(var(--column-width) * -1);
  z-index: 2;
  background: red;
  color: #d0ff00;
}

#item3 {
  z-index: 1;
  background: black;
  color: white;
  left: 0;
}
The only two things that worth mentioning here are that:
- We have positioned the divs with the shoes outside the viewport, on the left. We’ve done that because that’s how our clip should look like in zero milliseconds. Later we will make them slide in
- That the html is not just html is a template engine that also supports the mc-for and mc-if directives for loops and conditional statements. For the sake of simplicity we’ll keep it plain html in this tutorial. Just remember one rule, each clip must have a single root element on its html.
Effects Intro
Now it’s time to put some action in our clip. The clip that we’ve created already owns a timeline into which you can drop incidents anywhere and anytime you like. But what are Incidents? In MC we call Incident anything that can be positioned on a clip’s timeline. There are various types of Incidents but two are the most important: Effects and Animations.
- Effects allow you to animate any attribute of any element of our clip. CSSEffect that comes with MC is a great example, as it’s just an Effect that allows you to animate the css properties of your clip’s elements
- Animations on the other hand are full parametric clips which you can position anywhere in your clip
For start we are going to use CSSEffect which will allow us to animate the left css attribute of our divs in order to achieve the slide in and slide out effect we want to achieve.
First Effect
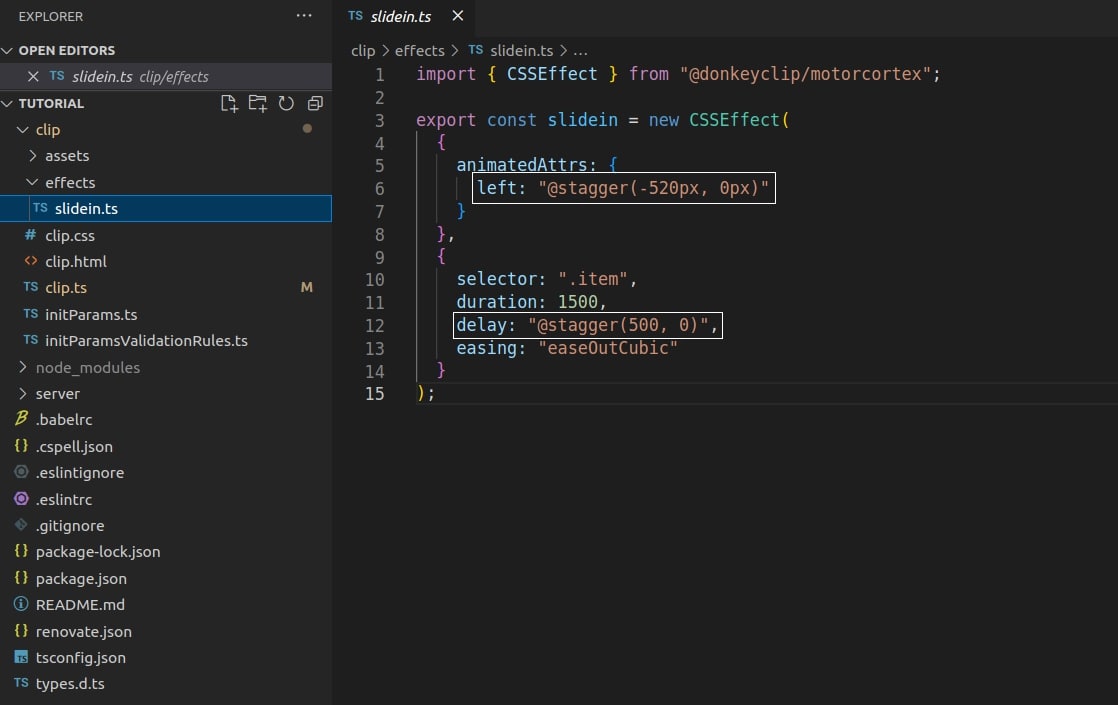
Go to the “effects” folder and create a new file in it with the name slidein.ts. Open the file and do the following:
- Import class CSSEffect from MC
- Instantiate a new CSSEffect object. We need to provide two arguments:
- Attributes
- Properties
Properties are more or less standard for all supported Incidents by MC. There you can define:
- Selector (where to apply the incident)
- Duration
- And the standard timing props we see in all animation libs which are easing, delay, hiatus and repeats. You can check more about Effects properties here
Effects “attributes” object must always include the animatedAttrs key which holds an object that defines your animation. You can put whatever you want to animate in there by just defining its target value. The starting value is automatically calculated by MC on runtime.
With our first effect we want our divs to enter the viewport, so we want to animate our divs' left value.
To start we are going to set:
- left: 0px, so that our divs enter the viewport
- selector: “#item3”, we are only going to target just one of our divs for start
- duration: 1500, duration is always in milliseconds
- easing: easeOutCubic, one of our supported easings. You can check the full list here
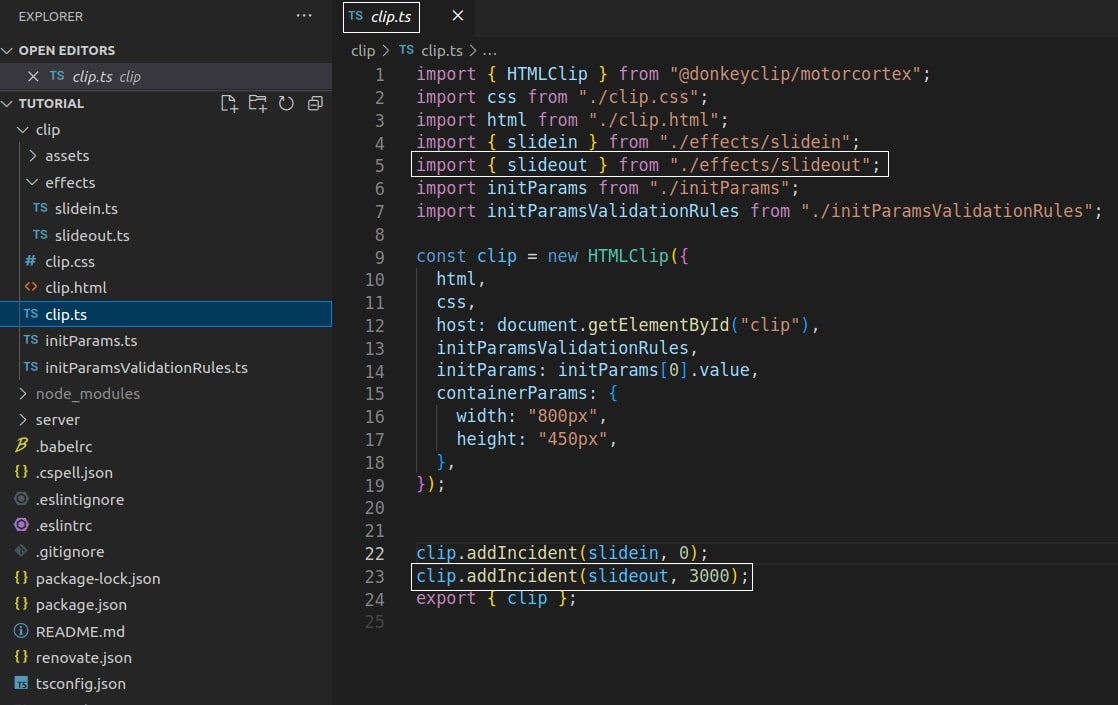
Our Effect is ready, let’s put it on our clip’s timeline.
Go to clip.ts file, import the Effect you just created and by the use of the addIncident method of your clip just drop it anywhere in the clip’s timeline. We are going to put it on millisecond 0.
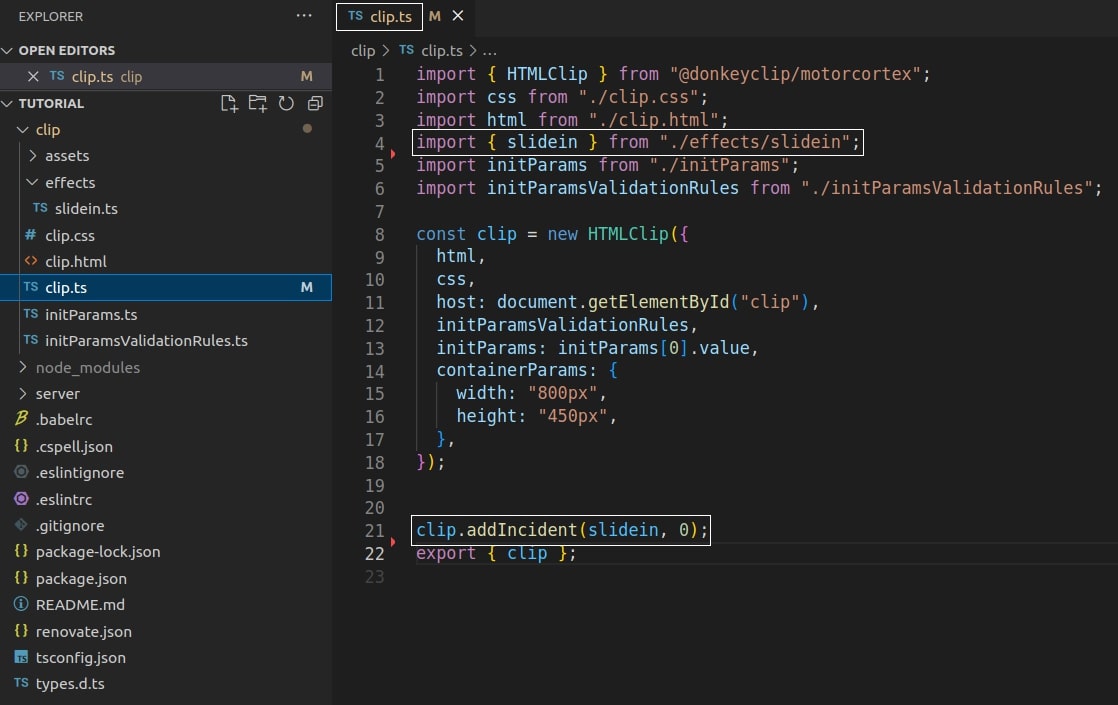
By going on DCode you’ll realise that the duration of the clip it’s now 1500 ms and we can play, plause or seek into our clip by the use of the player controls.
Stagger on left and duration
In the exact same way we can create one Effect per each of our two other divs and just position them on our clip. According to the plan, we want the first div to go to left: -520px, the second to -260px and the third one to 0px left.
Instead of creating three different incidents for this we can make use of the “dynamic values” provided by MC. Dynamic values provide the ability to define the value of any Incident’s attribute or property in a dynamic manner. You can check the full list of supported dynamic values on MC’s documentation but for the needs of this tutorial we are going to use “@stagger”. For those who are not familiar with stagger please go ahead and have a read about it as it is a very standard approach for animations.
In essence, when applying an effect to multiple elements, stagger allows you to define the value you want the first and the last element to get and the rest of the values (of the intermediate elements) will be automatically calculated in a linear manner. Unless of course if you provide easing. There are more sophisticated options on the stagger implementation of MC which you can check on documentation but for now we will stick to basic usage.
Going back to our clip we will change our slidein Effect and apply it to all of our divs by changing the selector from id to class. We will make use of stagger and set left to @stagger(-520px, 0px) and we’ll also use stagger in order to play with delay which will result in a much more “elastic” movement of our divs. Just check the state of the clip now that we’ve made these changes.
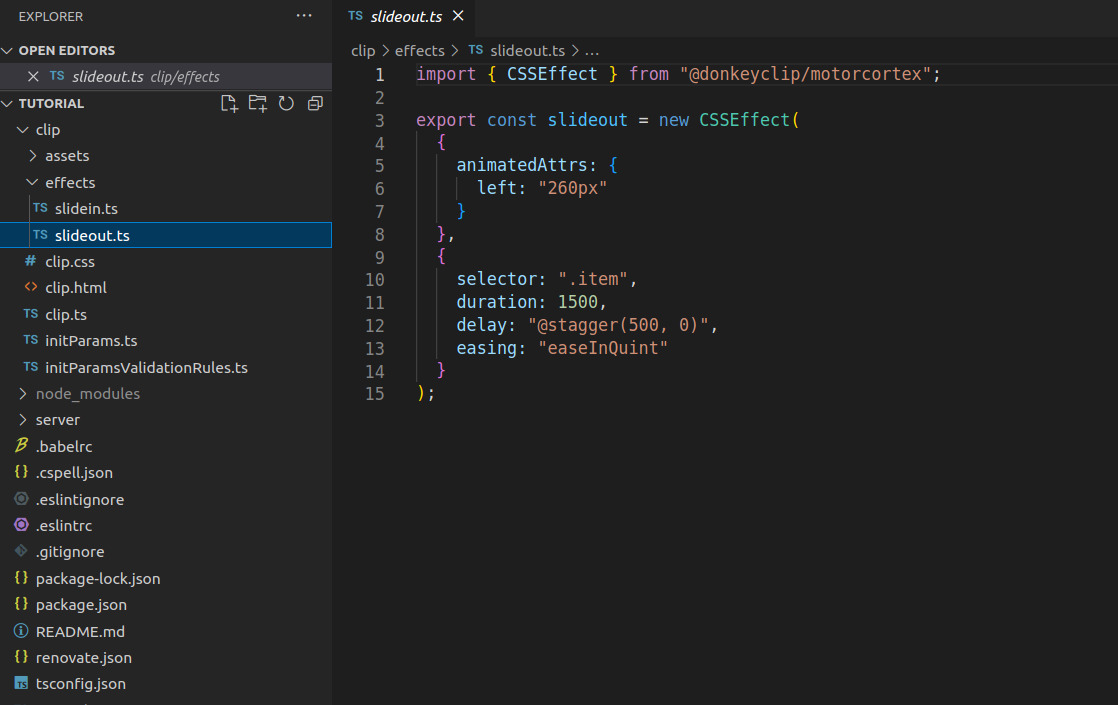
Slide out
Following the exact same logic and syntax we are going to implement the slideout effects as well. We’ll create a new file, name it slideout.ts, put our attributes and properties and then we go back to clip.ts and position it on millisecond 3000 so the shoes remain for 1 second still before they start sliding out.
Plugins
Let’s get one step further and add one more tiny scene in the beginning of our banner that will inform the users that the shoes are new arrivals. We will put the “Winter 2022” text to make this clear. To save us time we are going to use a plugin for this. MC has many plugins and all of them expose Incidents ready to be added on our clips.
Types of Plugins
All supported MC plugins can be found on the Inspirations page of dc.com, on the “plugins” tab. There you’ll find plugins that allow you to do various things such as embedding videos on your clips, apply morph and svg draw effects but also more creative plugins like animetitles plugin, which we are going to use. Creative plugins expose animations which are small parametric clips which you can directly embed anywhere in your clip.
Animetitles Incident
Let’s use the Circle Incident of animetitles plugin. We want it to take the full view port and the shoes to slide in and out in front of it.
Circle Animation embed
For this we are going to add one more div in our clip and style it accordingly. Let’s give to this div the id #intro. Start by npm installing the plugin
npm install --save @donkeyclip/motorcortex-animetitles
Now go to the animations folder and create a new file with the name intro.ts and paste the example code from the plugin’s documentation.
const nameOfIncident = new Titles.Circle(
  {
    fontSize: 40,
    circleColor: "#ff0000",
    textColor: "#000",
    title: "ANIMATED",
    subTitle: "TITLES",
    stopOnLast: false,
    fontFamily: "Righteous",
    width: 500,
  },
  {
    selector: ".circle",
  }
);
Inspect that the properties remain exactly the same as in any other Incident and the only thing that changes is the attributes.
We are going to edit the attributes so we get the colors, the size and the copy we want. You will also edit its properties accordingly. We put #intro on the selector and the duration we want and we are pretty much ready with it.
The only thing to do now is to drop it on our clip’s timeline, on millisecond 0. The only thing we now need is to move slidein and slideout effects a bit to the right.
Groups
We can easily just edit the millisecond of addIncident commands for slidein and slideout effects. This might be ok for a clip of that size but while the clip scales and gets more and more Incidents in it this won’t be convenient.
Let’s organise our clip a bit better and put both slidein and slideout effects on a single Group and store it in our “scenes” folder. This way we’ll be able to move the Group within the clip’s timeline very very easily, whenever we need to.
Go to scenes folder, create a new file with the name slideinout.ts, import “Group” from MC, create a new Group and just add the Incidents slidein and slideout diretly in it. Once you’ve done that, go to clip.ts file, remove the lines that import the two Incidents and instead now just import the Group you’ve created and put it on the clip’s timeline. Now we can put this full Group on millisecond 2500 and as you’ll realise this will work as charm.
InitParams
Our banner is ready but let’s hung on a moment before publishing it to donkeyclip. The beauty of MC and DC is that we are now creating a clip template, or if you prefer a parametric, or dynamic clip that can accept parameters and change any time, even on run time. We are creating a donkeyclip.
You can make pretty much everything parametric, including text, images, colors etc. In our case we are going to make our four colors parametric.
For start open the file initParamsValidationRules, which is where we define the parameters of our clip. Let’s add all four of the colors giving them type color, naming each of them, marking them as optional and providing a default value for each.
export default {
  colorA: {
    label: "First Color",
    type: "color",
    optional: true,
    default: "black",
  },
  colorB: {
    label: "Second Color",
    type: "color",
    optional: true,
    default: "#d0ff00",
  },
  colorC: {
    label: "Third Color",
    type: "color",
    optional: true,
    default: "white",
  },
  colorD: {
    label: "Fourth Color",
    type: "color",
    optional: true,
    default: "red",
  },
};
Now our clip will expect these initParams on the initParams key of its properties.
We can now go ahead and define one, two or any number of parameters sets in order to test our clip and we can define them on the initParams file. This file exports a collection each object of which represents a set of initParams. Let’s add a couple here. Just provide a name for each and then on the value key just provide your initParams.
export default [
  {
    name: "Default",
    value: {
      colorA: "black",
      colorB: "#d0ff00",
      colorC: "white",
      colorD: "red",
    },
  },
  {
    name: "Secondary",
    value: {
      colorA: "red",
      colorB: "black",
      colorC: "white",
      colorD: "#d0ff00",
    },
  },
];
You’re done. Go to DCode and you’ll find them right there.
InitParams use
Now let’s see how we are going to use these parameters on our clip. initParams can actually be used everywhere. You can use them on your html, css you can even use them to pass values on your Incidents.
In the specific case our html doesn’t get affected by the provided params so we’ll leave it as it is. In our css file though we need to make changes. We can easily refer to any initParam of the clip on its css file by the use of double curly brackets and initParams. We are just going to define four css variables on the top of our css file and with this technique we will use them all over the rest of the file.
Along with this change we need to also pass the second and fourth colors (colorB and colorD) to our intro incident. It’s also very easy. On the definition of any of your Incidents you can use the dynamic value @initParams and refer to the value of any initParam of the clip the Incident belongs to.
Our clip is now parametric! You can continue making it even more parametric by changing the html of the clip.
Publish Clip
The big moment has come! We are ready to publish our clip!
In order to publish a clip on dc.com you first need to create a free account. If you are using Dcode for the first time, on the top right corner of it you’ll find the button Connect. Press on it and either sign up (or sign in) via Github, Gitlab or Google. Once you get logged in you’ll see the button Publish right next to your avatar.
As soon as you’re ready just press the Publish button and you’ll get directly to the publish page of dc.com where you can add details for your clip such as name, description, cover image and git. The css core is not important for the moment, just leave it as it is, accept the terms and publish it.
Once you publish it your donkeyclip is now public and available both for you and any other else to use it. You can find it on your profile’s page but also you will find it on the Inspirations page if you search for it.